
CapCut is an easy and simple to use video editing tool that allows you to make wonderful videos. The Up and Down Effect is a fun impact that you may use in your videos. This look adds interest and flow to your video by making it move closer (zoom in) and then further out (zoom out). And learn How to Make Up and Down Effect On CapCut PC?
As exciting motion effects started to be used in social media videos, the “Up and Down” effect on CapCut PC rose to popularity. A video editing set called CapCut lets users move films up and down to keep up with music. People started making fun, moving, and joke videos using this effect. As more makers got good with it, their videos became more creative and kept.
Use this detailed guide to find out how you can do this with CapCut for PC. Once you have the knowledge, you will be able to understand capcut.
What is the Up and Down Effect?
Zoom in on a video, and then zooming out on it gives it the “Up and Down” effect. The “up and down effect,” used in video editing, is the process of giving a sense that a subject or object is moving vertically in a routine, oscillating steps such as a jump or bounce. It’s a visual way for giving videos more energy and a feeling of fun movement. Making things seem to move regularly between higher and lower positions is simply what it is.
Step-by-Step Guide to Making the Up and Down Effect in CapCut on PC
There is a following step-by-step process to make the up and down effect in CapCut.
Open CapCut on Your PC
First, check that CapCut is installed on your PC. Check the official The CapCut function website and install it if you haven’t before. After installation, click CapCut and select New Project.
Import Your Video
To start, click the import icons in CapCut PC to select the video you want to edit from the computer. When imported, drag and drop the clip onto the Timeline at the bottom of the screen. You will set up, cut, and apply effects to the film in this order for an easy editing process.
Select Your Video Clip
Click on your video to select it after you’ve put it to the timeline. Post choosing, the editing panel shows plenty of editing chances. After this, you may play with those options to make changes and add personal style to the movie.
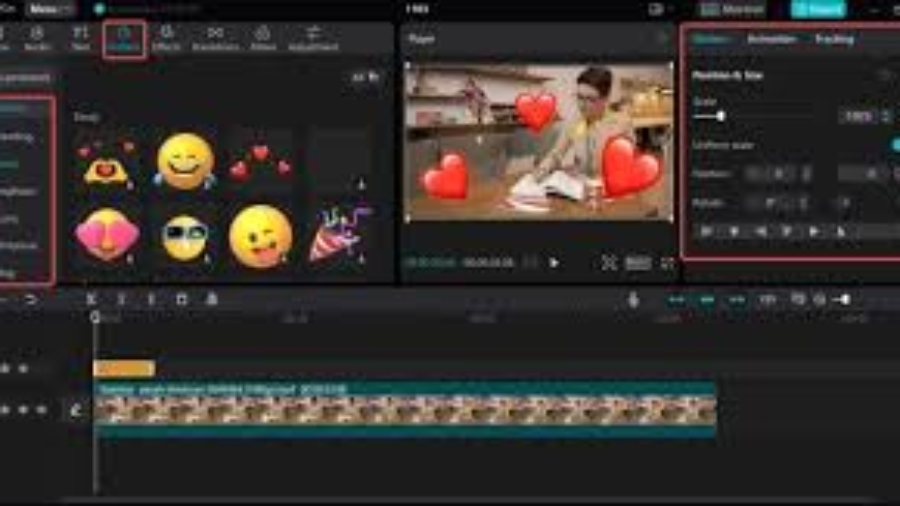
Open the Keyframe Tool
You may add movement to a movie with keys, which are little markers. They tell CapCut where to begin and end an effect.
Move the Playhead, the vertical white line on the timeline, to begin the zoom-in effect. Click the Change option in the editing box. Find the Keyframe button, which has a small ring, and click it. This sets the first keyframe.
Add the Zoom-In Effect and learn How to Make Up and Down Effect On CapCut PC?
To stop the zoom-in effect, move the Playhead forward a little bit (about 1-2 seconds).To increase the size a little more (such as going from 100% to 120%), click the Scale option under Transform. The film looks to be zooming in as a result. Naturally, a second keyframe showing the change will be added.
Add the Zoom-Out Effect
To begin the zoom-out effect, move the Playhead forward one again. To make a new point, click the Keyframe button once again. Reduce the Scale back to 100% (or lower if you want a larger effect) and move the Playhead further. This produces an easy zoom-out.
How to Make Up and Down Effect On CapCut PC Preview and Adjust?
To see the effect, click the Play button. You can alter the speed by moving the keyframes closer together or more apart if the movement is too quick or too slow.
How do you copy effects in CapCut PC?
Copy effects in CapCut PC involves copying the edits and effects from one clip to another. This is the normal method:
Copying Features
The “attributes” of a clip, such as effects, color corrections, and other changes, can be cloned.Often, you could do this by selecting “copy attributes” if you right-click on the clip that has the desired effects.Keyboard shortcuts like “Ctrl+Shift+C” can also be used.
Pasting Features
Select the clip or clips where you want to apply the same effects after copying. One may use the keyboard shortcut “Ctrl+Shift+V” or right-click and select “paste attributes”.You can select what features you want to apply to the selected clips after the paste data window opens.
Keyframes
You can also copy and paste keyframes as well. You can use the usual copy and paste tools “Ctrl C” and “Ctrl V” to move keyframes to various areas of the same clip as well as in other clips by selecting the keyframes you have made.
Why Use CapCut?
CapCut is well-liked because it is a free, and easy-to-use video editing program. Many people find it easy since it is available for PC and mobile platforms. Along with additional features like it, effects, and transitions, it offers basic editing tools like clip popping and mixing. The it works nicely with social media, making content creation and sharing simple.
Conclusion
Using CapCut to make an up-and-down bounce effect is an ideal method to give your videos more energy and fun. Keyframes allow you to control item movement and make a realistic, smooth bounce. Take into mind that practice makes perfect! Don’t be uneasy to explore and plan new things. With little job, you can make some great flying videos that will shock your loved ones. Go ahead and start CapCut and begin bouncing! Have you.
Add a Comment