
Have you spent hours creating a flawless video on CapCut, then viewed it on your device or uploaded it to the internet, just to see it become grainy and blurry? This is one of those most infuriating issues video creators encounter, but the good news is that resolving it couldn’t be easier. When you understand the CapCut Export Settings for Best Video Quality (No Blur) proper export settings, your videos can be sharp, clear, and professional every time.
A lot of folks assume they need an expensive camera or fancy gear to make high-quality videos, but that’s not the case. The camera on your phone is likely good enough. The true secret is knowing how to export your videos properly from CapCut. In this guide, I’ll show you exactly which buttons to push and settings to select in order that your videos never again look fuzzy.
Why Do Videos Become Blurry?
Before we solve the problem, let’s take a closer look at why this is happening. Videos get blurry for a few main reasons. First of all, if you’re recording your video in the dark or on poor lighting then it will always be grainy and unclear. A video filmed badly cannot be fixed by any editing app. Your camera needs light to render clean images, so always shots in brightly lit places.
Second, when videos are saved, your phone compresses the file so it does not take up too much space. This process is called compression. Think of it as squeezing a sponge. The more you squeeze, the smaller it becomes, but you also lose water. In videos, compression can make files smaller but also worse if you squeeze too much.
Third, social media apps such as TikTok, Instagram and YouTube compress your video again after you upload it. They do this to conserve space on their servers, since they have millions of videos. So your video is compressed twice – once when exporting from CapCut, and a second time once you upload it to social media. If you’re not using good settings from the start, it’ll look like shit if you use all that squeezing.
Understanding Video Quality Words
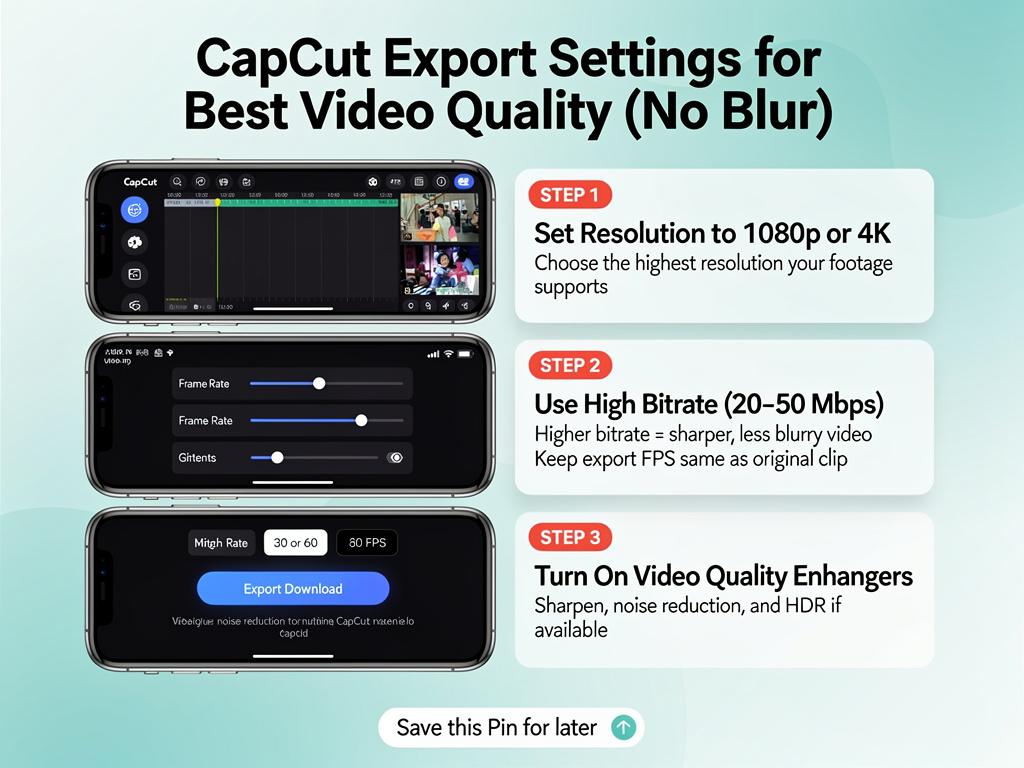
You only need to understand a few simple terms to produce work of the highest caliber. The quantity of tiny dots, or pixels, that comprise your video is referred to as resolution. The clarity of the image increases with pixel count. 720p, 1080p, and 4K are the most prevalent resolutions. 1080p is your best option if you’re focused on social media. It looks great without generating large files that take a long time to upload.
The number of images your video shows per second is indicated by the frame rate. The majority of videos have a frame rate of 30, which makes them appear smooth and natural to our eyes. For incredibly fluid motion, some people choose 60 frames per second, particularly in sports or gaming videos. 30 frames per second is perfect for daily videos that save storage space, such as vlogs, moves, or simply sharing your day.
The amount of information packed into each second of your video is what determines its speed. Better quality but larger files are associated with higher bitrates. Similar to how a wider hose can hold more water, a higher bitrate can handle more video data. Your bitrate should be high enough to provide excellent quality without making it difficult to share your files.
The Perfect Export Settings for Social Media
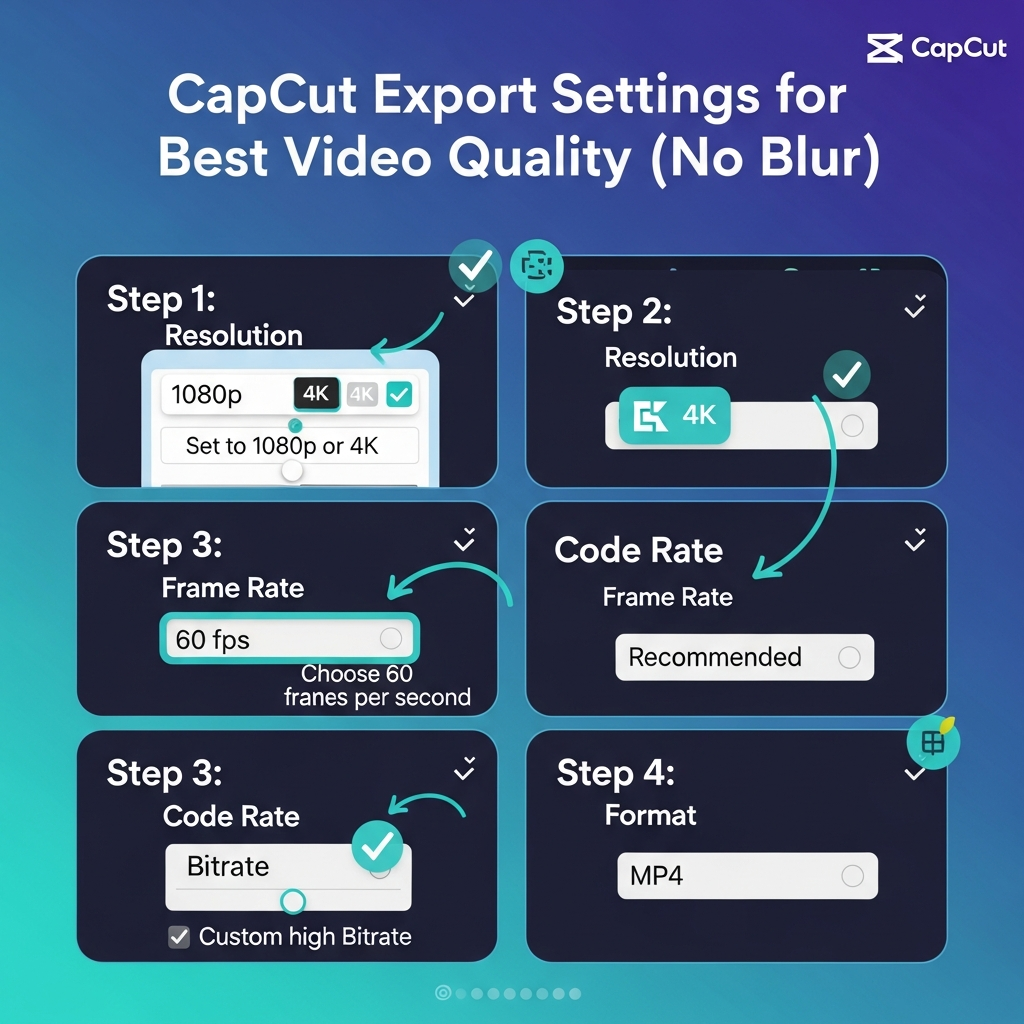
The CapCut Export Settings for Best Video Quality (No Blur). Let’s now move on to the important part: the ideal social media export settings. You’ll see a variety of options when you click the export button in CapCut after you’ve finished editing your video. Here are some options for the highest quality on YouTube Shorts, Instagram Reels, and TikTok.
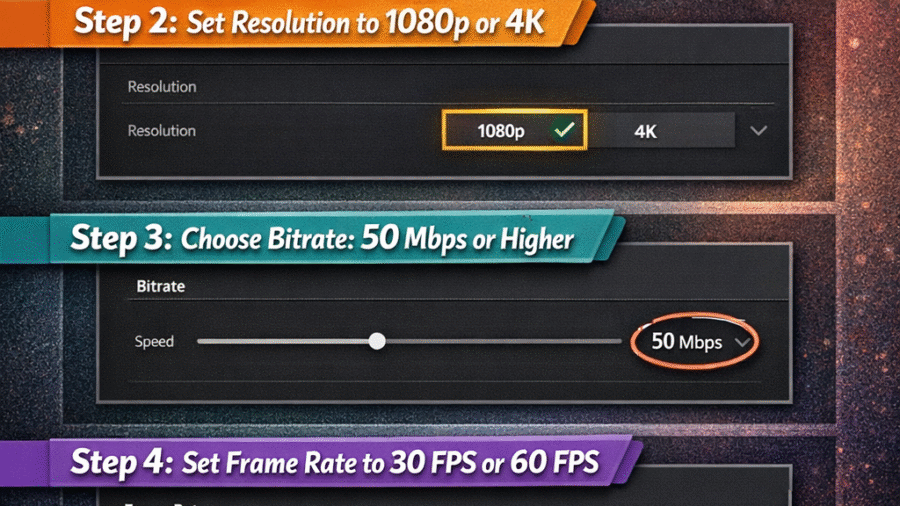
Always choose 1080p, also referred to as 1920×1080, when it comes to resolution. Avoid 720p because it is of lower quality. Additionally, stay away from that option unless you’ve filmed in 4K and it’s absolutely necessary because 4K files can be very large and take a long time to upload. 1080p is ideal for most people who share content on social media because it offers excellent quality without requiring large file sizes.
Choose a frame rate of 30 frames per second, or 30 fps. For regular videos, 30 fps is usually the best option, but if you record your video at 60 fps and want that ultra-smooth look, you can choose 60 fps. It ensures faster uploads and seamless playback on all devices while maintaining a great appearance and controlling file sizes.
In terms of format, use MP4. It functions flawlessly on all platforms and is the most popular video format. MP4 is your best option, though some phones may offer alternatives like MOV or AVI. MP4, which offers high quality without bloated file sizes, is supported by all social media apps.
How to Actually Export Your Video
Now, let’s dive into how to actually export your video. First, complete your video edits on CapCut, then take a look at it from beginning to end to check if it is just as intended. When it is, look to the top right corner of your video to see if there is an upward arrow or an “Export” button.
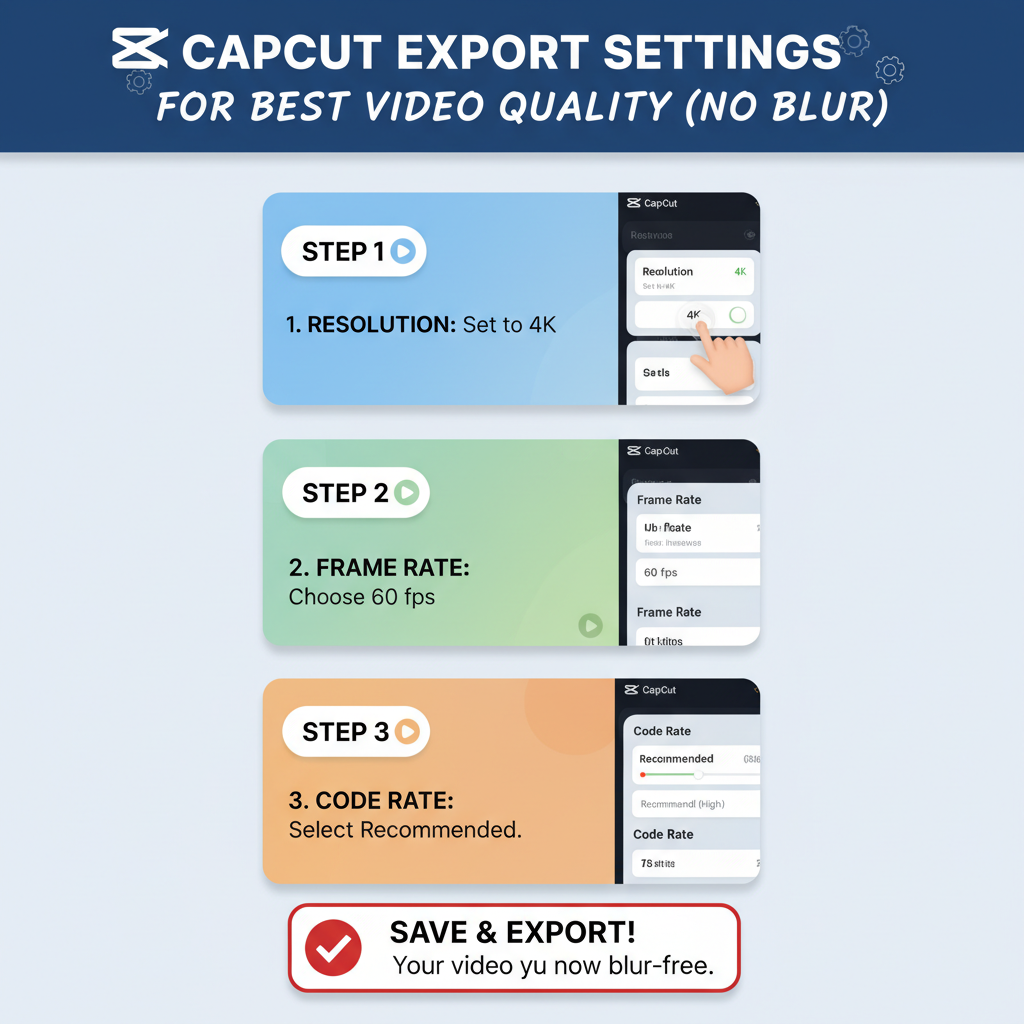
A new screen will appear with all of the export settings. Look for the “Resolution” option and tap on it. Options will come up like 480p, 720p, 1080p, and possibly 2K or 4K. Tap on 1080p. Find the “Frame Rate” setting. Ensure that it is set on 30 or 60 fps. For typical video clips, 30 fps will be the best option.
Now, search for CapCut Export Settings for Best Video Quality (No Blur), a good slider option, such as the option called Low, Medium, High, or Best. This is the most important thing! So, always move the slider to High or Best. But never go for Low or Medium, as the video will become blurry. However, in some versions of CapCut, instead of the slider, some numbers such as 8000, 12000, etc. are shown. So, in that case, select the highest number, such as 12000, most likely set in 1080p videos.
Critical Settings You Must Activate
However, there are some special modes which can actually improve the quality of your video. Firstly, look for something called “Smart HDR or HDR Enhancement”. If you can find this option, you should definitely enable it! This function adds more vivid colors to your video, making you realize the difference by yourself, once you enable this function in your new smartphone. It’s like the difference between a sunny day and a cloudy day when you toggle between enabling and disabling this function.
If there is one, look for a Noise Reduction option. If the video was shot in a dark area and tends to be a bit grainy, then this will smoothen things out on your behalf. It cleans up from the added granularity and gives your video a cleaner look. But if you shoot in good light and it’s already sharp, don’t turn it on. Sometimes, this can make things look a little too soft.
Also, check for Color Space settings if those exist in your version of CapCut. If you see an option for things like sRGB or Rec.709, go ahead and use one of those-a standard color setting will ensure consistency in colors wherever the video is viewed, whether from a phone or a computer.
Settings You Should Turn Off
Equally important as knowing what to turn on is knowing what to turn off. Of the best settings you absolutely want to turn off is the watermark! CapCut is free and won’t make you slap a watermark on your vids. Before you hit that export button, look out for a setting labeled Watermark or CapCut Logo and make sure it’s toggled off. No-watermark videos not only look way more professional, but they also tend to attract more views.
Any options similar to that, like Fast Export or Quick Export-just go ahead and disable those, too. Sure, they’ll speed up the process of exporting your video, but they lower the quality of it. And trust me, it’s well worth waiting just a minute or two more to have that clear, crisp quality. Good things really do take time!
Some versions of CapCut come with an Auto Enhance feature. While it’s very convenient-sounding, it does indeed sometimes make some tweaks that you don’t expect to happen to your video. Unless really necessary, best keep this turned off so you maintain full control over your video’s appearance.

Recording Tips for Better Quality
Even if you have the perfect export settings, there is no saving a video that has been shot extremely bad. Therefore, let’s take a look at some tips for recording videos that will be really great when you do the exporting. Firstly, lighting is a crucial factor! Sunlight is very effective. If you are indoors, ensure that all the lights are switched on or that you are near a window. Believe me, dark videos usually turn out being blurry and grainy, no matter how much you adjust them in CapCut.
Prior to recording, always remember to clean the camera lens of your phone. A quick wipe with your shirt or a soft cloth can effectively remove fingerprints and smudges. You wont believe how much clearer your videos can get just by having a lens that is totally cleanits like the difference between looking through a dirty window and a crystal, clear one.
Furthermore, you should try to make your phone as steady as possible during filming. The footage with a lot of shaking can be very blurry when there is movement involved. If you can, use a wall for support, put your elbows on a table or a use a tripod. Just being aware of your stability will make a big difference. Your videos will turn out to be quite professional and very clear.
Editing Tricks That Keep Quality High
There are couple things you can do when editing videos in CapCut to keep your video quality as good as possible before exporting your video.
Firstly, dont zoom in too much on your video. Digital zooming only enlarges each pixel, so you are likely to get a blurry image. If you want a close, up shot, it is best that you move physically closer to your subject while filming instead of zooming in during editing.
Choose your effects and filters wisely.
Some effects, especially the ones that blur the image or create glitches, may degrade the level of sharpness. Use effects that truly add to your video, but dont go overboard with them. At times, a fresh and neat style is much more attractive than a bunch of flashy effects.
Try to stick to CapCut Export Settings for Best Video Quality (No Blur) to fonts that are simple and easy to read when you place the text on your videos.
Also, make sure that your text is big enough for the audience to read without any difficulty on their mobile phones. Small text might actually turn out to be fuzzy and pixelated. And on top of that, try not to make your text move so fast, because speed can also cause blurriness.
Checking Your Video Before Uploading
After exporting your video from CapCut, don’t rush to post it on social media. CapCut Export Settings for Best Video Quality (No Blur).
- First, take the time to see it on your phone.
- Play it from start to finish and be vigilant for any blurry or unclear shots.
- You can also zoom in to different parts to check the quality thoroughly.
- If your phone screen shows a perfect picture, setting your export parameters to get a perfect video will be the easiest decision to make.
- On the other hand, if your video looks fuzzy even on your phone screen, then you have to re, export it with better settings before posting it anywhere.
- Go back to CapCut and verify that you have picked 1080p instead of 720p.
- Also, verify that the quality is adjusted to High or Best.
- One can easily choose the wrong option by mistake, so its definitely a good idea to check again.
- Dont forget to discover your video with the volume up!
- Its simply not enough to only concentrate on images because the audio also needs to be clear.
- Bad sound can make a person almost as upset as the video being out of focus.
If the music sounds as though its coming from under a blanket, then youll probably have to change the audio settings and export the video again.
Platform-Specific Tips
Each social media platform has its own unique ways of dealing with videos hence there are certain tips designed for each one. TikTok, for example, requires you to film vertically so just keep your phone in an upright position while recording. Export the video at 1080p and 30 fps. After uploading it to TikTok, dont add extra filters or effects in the app as they will decrease the quality. Its better if you do all your editing with CapCut first.
Instagram Reels require the same parameters as TikTok i.e. 1080p, 30 fps, and vertical format. When you publish on Instagram, choose Reels only don’t save the video as a Story first and then share it as a Reel. Instagram compresses Stories a lot, so posting straight to Reels is a better way to preserve the quality. Plus, if possible, use WiFi for the uploading instead of cellular data because WiFi is usually more stable and less likely to compress your video.
YouTube Shorts, on the other hand, can be a bit higher in quality because the YouTube platform is generally better at handling videos than any other platform. Export at 1080p or even 4K if that’s the resolution you recorded in. YouTube is also great with 60 fps so if you want that super, smooth motion, go ahead and use it.
What to Do If Your Video Still Looks Blurry
Occasionally, your videos may still come out blurry even if you are absolutely sure that everything is perfectly set up. So, how do you go about solving this? If your video is fuzzy just after you have exported it, even before uploading it, the problem is most probably with your export settings or the quality of the original footage. Give yourself a moment to go over all your settings again. Make sure that the resolution is 1080p, the quality is set to High or Best, and the frame rate is either 30 or 60.
But if your video is nice and clear when you watch it on your phone, and after that, it becomes blurry only when you upload it on social media, then the most common reason is that the platform is compressing the video too much. So, in that case, you should try to export it at a higher bitrate thus providing the app with a bit more quality to work with. Also, do not forget to use WiFi for your uploads rather than cellular data. Some apps even offer an HD or High, Quality upload optionbe sure it is turned on!
If you find that only certain spots in your video are blurry while the rest are super clear, it might be the case that you have zoomed in those parts during the editing phase or those clips were in higher resolution than others which made them appear blurry after resizing.
File Size and Storage
Generally, larger videos equate to better quality, and that is great because our eye also tends to notice more “detail” when watching a better quality than a low quality video. For example, a one, minute 1080p video shot with decent settings should be somewhere around 50 to 100 megabytes. Now, if your file is almost that small, somewhere around 10 or 20 megabytes, then it is most likely that your quality settings are low. On the contrary, if a one minute video has reached to 500 megabytes, then you have over, cooked your settings.
Different apps have their own size limits. For example, TikTok lets you upload videos4 up to about 287 megabytes if you have an iPhone and only 72 megabytes if you are on Android. Instagram has set the limit at 650 megabytes for an ordinary post, whilst YouTube is quite free with the length of files, so there is no need to worry about limits there. If the file for the video is too large for an application, you could remove a few seconds from the video rather than reducing the quality.
Check your phone storage before exporting the video. Exporting might not be successful or you may end up with a poor quality video if the memory of your phone is almost full. Deleting some chunks of old photos or videos is a good
Quick Checklist for Perfect Exports
Here’s the simple checklist you can use whenever you export a video from CapCut.
First thing, ensure that the editing on your video is totally finished. Give it a last run through and watch your video once more.
Then step out to the Export button on the top right corner and give it a click.
After that set the Resolution to 1080p.
The Frame Rate, select 30 fps for normal videos, or if you filmed at 60 fps and want the ultimate smoothness, keep the Frame Rate at 60 fps.
Then put the Quality to High or Best, or if you see numbers set the bitrate to 10, 000 at least.
Toggle Smart HDR on if it is there. Meanwhile, be sure to uncheck the Watermark.
Check that the Format is MP4.
At last, hit the export button and wait for it to finish processing, don’t close the app during this time!
You will find your newly exported video on your phone and if you like, you can even give it a quick play to make sure it looks perfect before posting it.
Following the steps on this checklist every time will save you from missing out on any settings and getting a blurry video as a result. Moreover, you can make it a point to save this checklist as a note on your phone for convenience!

Frequently Asked Questions About CapCut Export Quality
Q: What resolution should I use when exporting videos from CapCut?
A: Always use 1080p for social media videos. The CapCut Export Settings for Best Video Quality (No Blur) give excellent quality without creating files that are too big. Only use 4K if you filmed in 4K and need the absolute highest quality for platforms like YouTube.
Q: Why does my video look good in CapCut but blurry after uploading?
A: Social media platforms compress videos when you upload them to save space. To fix this, export at the highest quality settings, upload using WiFi, and make sure you select any HD or high quality options when posting.
Q: Should I export at 30 or 60 frames per second?
A: Use 30 frames per second for most videos. Only use 60 fps if you filmed at 60 frames per second and want extra smooth motion for sports, gaming, or action content.
Q: How do I turn off the CapCut watermark?
A: In the export settings screen, look for an option labeled Watermark or CapCut Logo and switch it off. CapCut is free and doesn’t force watermarks, so you can use CapCut Export Settings for Best Video Quality (No Blur).
Q: What is bitrate and what should mine be?
A: Bitrate is how much data is used per second of video. Higher bitrate means better quality. For 1080p videos, use 8000 to 12000 kbps, or simply choose “High” or “Best” quality in the settings.
Q: Why is my exported video file so large?
A: Large files usually mean high quality, which is good. If it’s too large to upload, you can slightly reduce the bitrate, make the video shorter, or remove some effects that increase file size.
Q: Can I make a blurry video clear after exporting it?
A: No, once a video is exported with blur or low quality, you can’t fix it. You must go back to your CapCut project and export again with better settings. Prevention is the only solution.
Add a Comment