

Video creation is extremely entertaining, and CapCut provides an opportunity to make cool stuff, which is easy enough to be made by any person. However, sometimes you might not look as good as you would like to be, even when you are doing your best. The good news? The majority of these issues can be corrected simply by understanding what is going amiss. So, in this article, you will learn CapCut Editing Mistakes That Ruin Video Quality (And Fixes)
Now, we will discuss the most typical errors of users when editing videos in CapCut and the methods on how to prevent them. We can hardly wait to read this and see your videos much better.
Exporting Videos at Low Quality
This is most likely the greatest error that individuals commit and it is so simple to recover! CapCut provides you with a range of quality options when you complete editing your video and press the export button. Most individuals simply swipe export without customizing the settings and the video appears to be blurred or fuzzy.
The Problem: When you manufacture with 720p or below level of resolution, your video will not look clear particularly on larger screens. It is as if one was seeing a picture through some foggy glasses.
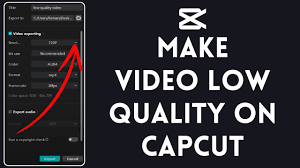
The Fix: 1080p or even higher should you be able to export it on your phone. The quality settings are found before you export. Select the maximum possible resolution. Yes, it will be a larger file and it will take you a little more time to save the video but it will be crystal clear. When you are recording on YouTube or on Instagram, this is a massive difference.
Another thing to remember is to ensure that the frame rate is of what you have recorded. Export at 60fps, in case you shot at 60fps (frames per second). In case you shot at 30fps, then export at 30fps. Confusion between these may result in a video that is strange.
Using Too Many Transitions
Transitions are those cool effects which occur when you change one clip to another one. They are entertaining to play with and CapCut has millions of them! However, the point is in the following: the abundance of various transition effects may make your video look disorganized and amateurish.
The Problem: When each and every clip uses a different spinning, zooming or moving transition, you distract your viewers. They are not thinking of what you are saying, but rather, what outrageous impact is next. It is like having a shirt with all the colors of the rainbow on it simultaneously.
The Fix: Choose a transition or two that is appropriate to your video, and use those. In the cases of most videos, just cuts or rapid dissolves do the job. Use the fancy transitions in special occasions, such as when you are switching to a totally different subject or scene. In some cases, it is the transition that is not best at all! Clean cut between one clip to the other usually comes out the most professional.
Ignoring Audio Quality
High-quality video is of no use when your sound is horrible. Most individuals concentrate on the appearance of their video and they forget that sound is also paramount.
The Problem: Background noise, too quiet voices, too loud music, or a cut in and out audio will cause people to stop watching your video. The ears are extremely sensitive and poor audio is in fact more vexing than a slightly hazy picture.
The Fix: Rectify this by wearing headphones every time you are editing. This also assists you in listening to what your viewers are going to listen to. Regulate the volume levels such that everything is equal. Your speech must be well-intelligible. Background music must remain background; it is to be heard but not to be overwhelming.
CapCut has an option of decreasing background noise. Use it! Moreover, in case you have taped somewhere noisy, you can remove the most annoying parts, or play some music over the distracting noise. In addition to music, fading in and out is better than suddenly starting and stopping.
Excessive Use of the Effects and Filters
CapCut possesses incredible effects, filters and animations. They’re exciting to use! However, it is easy to overload the effects and it is akin to placing ketchup, mustard, chocolate sauce and hot sauce on the same sandwich. Everything could be good individually, but all combined is a nightmare.
The Problem: As soon as you apply glitch effects, color filters, screen shakes, and various animations simultaneously, you will find it difficult to watch your video. The eyes of your viewers do not know where to look and the video seems to be chaotic.
The Fix: Less is more! Select effects that can actually assist in telling your story or even fit the mood you are trying to achieve. Perhaps some well-placed effects would be great, especially when you are making a funny video. When you are doing something more serious or informative, then simplicity is the way to go. Every effect must have a purpose of being there.
Watch the entire video to make sure you are ready before exporting. When something feels overwhelming then go with it and eliminate it.
Failure to Stabilize Shaky Video
We have all filmed videos when we were walking or moving. The thing is that sometimes those clips are so shaky and it is not easy to watch shaky video. It may even cause certain individuals to get dizzy or sick.
The Problem: wobbly filming is amateurish and is not comfortable to view beyond a few few seconds.
The Fix: The CapCut has a stabilizing software integrated! Find your wobbling clip and search the stabilization button and switch it on. Most of the shakiness will be eliminated by the app. It will not turn your video into a rocket which was literally jumping, but it will certainly get it better.
In further videos, attempt to hold your phone between your hands and in addition, hold your arms close to your body as you record. This helps a lot. Or press some wall or place your phone on a firm surface.
Using the Wrong Aspect Ratio
Various social media have varying shapes of videos. A video created in YouTube may not appear correct in Tik Tok and a video in Tik Tok will certainly not appear correct in YouTube.
The Problem: When you create your horizontal (sideways) video on Tik Tok or Instagram Reels, it will contain some black bars on the sides and be very small. When you create a vertical (up and down) video on YouTube, it will not occupy the screen adequately.
The Fix: You have to choose where you want to post your video before you begin editing. Next enter the appropriate aspect ratio:
- In the case of Tik Tok and Instagram Reels: 9:16 (vertical/portrait)
- In the case of YouTube: 16:9 (horizontal/landscape) is to be used.
- In the case of Instagram feed posts: 1:1 (square) or 4:5 (somewhat vertical).
The aspect ratio of the project is selected upon starting the project with CapCut. Choose the correct one initially and the entire editing would be less complicated.
Cutting Clips Too Quickly
You want things to move and be interesting when you are editing. However, cutting clip to clip too fast may in fact make your video irritating and tiresome to view.
The Problem: When every clip lasts half a second or a second, you do not even have time to comprehend what you are watching. Their brains are overloading to keep up and they may simply turn their head and scroll over your video.
The Fix: Allow every clip to take its time and be recognized by your audience. On average three to five seconds per clip is a good rule, but again it will depend on what you are displaying. In case it is valuable information or a nice moment then have it on the screen longer. It may only require a second or two shots in case it is just a transition shot.
Watch your video and say to yourself: Can I get away with what is happening? When you are lost and the one who made it, your viewers are literally going to be lost.
Forgetting to Color Correct
Your video clips are sometimes not similar. One may be sunny and light, the other, may be blue and dark. You see them together and you know that they are shot at different times or in different locations.
The Problem: Pieces of your video do not fit together because of colour and brightness, you are making their video choppy and amateur. It interrupts and reminds the viewers that they are viewing a edited video.
The Fix: CapCut has adjustment of colors! You have an opportunity to adjust the brightness, contrast, saturation and the temperature of your clips. Attempt to make everything on your clips to resemble each other. When it is too dark make it light. Whenever one is too warm (orange-looking) cool it down by corresponding to others.
You do not have to be a professional in color grading. All you need is to ensure that your clips do not appear to be a part of a different video.
Failing to Preview Prior To Exporting
For learning this CapCut Editing Mistakes That Ruin Video Quality (And Fixes) ,sounds obvious but so many fail to do this! They complete editing, export, and only to notice that there are errors in their video.
The Problem: You may not realize that you left a clip that you are going to delete, your audio is not playing, or some other strange glitch in a transition. You have already posted and exported your video, and that is too late.
The Fix: Make sure before you export your video, you have watched the whole video. Watch it at least twice. The first time, watch it as though you are a viewer watching it the first time. The second time, check such technical aspects as audio levels, transition, and timing.
It costs you some additional time, yet it would spare you the embarrassment of posting a video with some embarrassing mistakes.
Giving Your Text Too Small or Too Fancy
It is also great to add text to your videos to emphasize the important points or add captions. But when your people are unable to read your writing, you had better not print it!
The Problem: Small text that is not very easy to read, overly fancy or decorative fonts used, or text that is merged with the background of the video all render it frustrating to watch. It is important to remember that most people are watching videos on their phones which have small screens.
The Fix: Simple bold fonts are to be used to make reading easy. Keep your text large such that you can make someone reading it on a phone read it without straining their eyes. You can either place a coloured background behind your letters or you can place a stroke (outline) around the letters so they can be seen against whatever is being placed behind them.
Black text on white has been working on nearly any background. Do not leave your text on the screen too long and have people struggling to read it, a good tip is, read out loud twice and that is how long it should be kept visible.
Final Thoughts
To create excellent videos using CapCut, it is not necessary to use all the features that the application provides. It is about properly applying the appropriate features. To begin with, start with high-quality videos, make your edits straight and free, care about the quality of video and audio, and preview your work before posting. There is an important thing to remember that even professional video editors, CapCut Editing Mistakes That Ruin Video Quality (And Fixes) is also necessary.
So, you know about CapCut Editing Mistakes That Ruin Video Quality (And Fixes). Their difference is that they learn with them and improve with every video. There is no need to be afraid to experiment and explore new things, but there is also no need to be afraid to remain simple. Your videos are unique and personal, and it is your ideas and personality that make them special, rather than some fancy effects and complex edits. Concentrate on narrating your story, and the technical will be fine with time. Make some amazing videos now! And do so, without committing these widespread errors, and your videos will appear more than ever.
Add a Comment